
Crayon Quilts
November 20, 2012 Abandoned book "Strawberry Shortcake Murder" by Joanne Fluke ♦◊◊◊◊Okay, it's not hard:
Choose a picture.
Iron some decent quality white muslin or Kona cotton and cut to an inch or two larger than your desired block or quilt.
Iron freezer paper to the back of the muslin (yeah, I don't really know if there's a front and back to muslin).
Trace picture onto muslin. I used a Frixion heat-erase pen.
Color the picture.
Remove the freezer paper (you might be able to use it again).
Place the muslin color side down on a brown paper grocery bag and cover the back side of the muslin with tissue paper or 'throw-away' muslin. It helps to be able to kinda see through this top layer.
Press the picture. Lift the iron when moving from spot to spot on the picture, don't slide it.
Move the picture to a new part of the brown paper and press again.
Remove the tissue paper or throw-away muslin. Press some more. Move some more. Keep moving and pressing until no wax shadow shows up on the bag.
Let the picture cool completely, then stick it up to your nose and take a deep snorf. If you smell ANY crayon, press it more.
Now you're ready to turn your block or picture into a quilt!
Here are the notes for the steps above:
Don't try to be super frugal with your muslin. It's difficult to color right to (or near) the edge of the fabric. It's better to trim it down after all the coloring & ironing is done.
I use a Frixion pen. I know that some people are freaky about the marks coming back and that the long-term effect on fabric has not been determined. I'm willing to take the chance.
Lighter coloring (not as much crayon transferred to the muslin) irons much more quickly and the result is fairly delicate. Darker coloring takes longer to iron, but leaves a much stronger color. If you choose to go 'dark', take a break often so that your crayon doesn't soak up the heat from your hand and snap into two pieces while you're on a roll. (Voice of experience here!)
The reason for the tissue paper/throw-away muslin is that the first couple of presses release a LOT of crayon 'fumes' into the air. I didn't want to take the chance that any wax would transfer to my iron, plus when I didn't do it, I was smelling crayon for hours afterward. After the first couple of presses, though, much of the wax is transferred to the paper bag and there seems to be less chance that it will transfer upward.
If you slide the iron, especially in the first couple of presses, you run the risk of smearing/bleeding the wax.
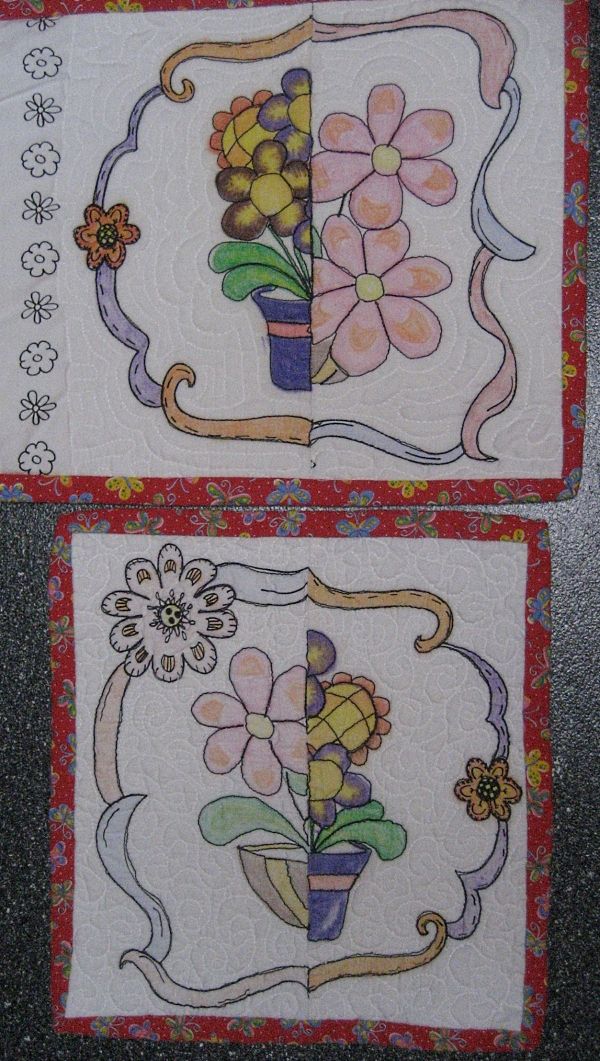
What kind of crayons did I use? Regular old Crayola crayons. Okay, NEW ones because I still love opening a new box of 'color crayons'. But here's the thing: I also bought a 'cheap' brand at Wal-Mart, intending to show their inferiority. Not so much. Except that they bled a bit (the wax spread and stained a little around the edges), they were perfectly serviceable. But they don't come in the cool 120-color boxes!! Here is the comparison between the two brands of crayon. The darker flower bouquet is the Wal-Mart crayon, the lighter bouquet is Crayola (all of the quilts from yesterday's post were Crayola).
 I know the next question (which was likely your FIRST question). Can you wash these? Yes. They fade a little bit so I don't know that I'd do something that needs to be washed every week, but yes. Here's the Crayola sample before (right) and after. Both samples use poly batting and non-prewashed muslin.
...aaaand the Wal-Mart brand (I think it was something like Cra-Z Crayons). There was more pigment transferred to the muslin so it stays darker. But it still does fade a bit (right side). I've got lots of ideas. Oh, my, the ideas. What about coloring Drunkard's Path blocks? (Yes, I've got that project started!) What about other curved-piecing blocks? I'll bet you could do a gorgeous Baltimore Album quilt. Or Christmas Tree ornaments. Oh! Here's one: Take a black & white print and color it. All of a sudden you can have the PERFECT sashing to coordinate all of those mis-matched blocks!
Labels: quilting
permalink Carrie P. Babbled Back:
sounds like you are having fun. I love a new box of crayons1
Sharon Babbled Back:
Thank you for the tutorial! I LOVE to color (still) and I've never been too sure of how to put it on fabric. I tried the "fabric crayons" without too much success. I really appreciate the tips!
I have a Hello Kitty coloring book that may need to become a quilt! hee hee!
Lorna McMahon Babbled Back:
Great idea! Thanks for sharing all the detail and experience with this!
Unknown Babbled Back:
Thanks so much for pointing me into your directions and tips...I will defiantly try this and post on my blog when I do....I appreciate it.
Bev Babbled Back:
Where is the pattern???
Thanks Bev in Ohio
Fiber Babble Babbled Back:
To my most recent commenter, Bev: There is no pattern! The samples I've shown in this post were done on my doodle flowers a pre-printed muslin panel of frames.
Psst! Bev, you're a no-reply blogger, so I couldn't reply to you directly :-( I wrote a post about how to fix that HERE. I hope you go and check it out!!
Want to Post a Comment?
HomeLook! Labels!
- Stitchery
- Quilting (of course!)
- Sewing (but not quilting)
- Aprons
- Babble (Includes Rants)
- Blogging Ups and Downs
- Charity Crafting
- General Crafting
- Adventures in Felting
- Holidaze
- The Ubiquitous "Intro"
- Knitting Machine Fun
- Knitting, Mostly by Hand

These Posts Might Change Your Life!
The Last Time I Was
CUTE
- Click the Pic to Visit My Blogger Profile
-

Where I Hang Out
- Visit Me at Google Plus!
-

Previous Posts
- The Time Machine
- Birdies in the Cabin
- I'm In a Quilting Guild!
- In My Little Corner
- Meet Veronica
- The Almost Bag
- Oh, Forget Catching Up
- I Feel Like I'm Cheating
- Spring Slugfest 2012
- A Gift Or A Curse?


 people have looked at this blog - Cool!